Hello there,
This is Ujjwal and today I have some beautiful mixed media masculine gift tags to share with you. Most of us struggle with masculine projects, I know I do, so I thought I would share how easy it was to make these tags using the Dress My Craft My Gentleman papers and punches.
Before I share the details on the project, I just wanted to share my social media handles so you can connect with me if you'd like to. You can easily find me at,
Blog: Handmade with Love
Facebook: Handmade with Love
Instagram: Handmade with Love
YouTube: Handmade with Love
Dress My Craft, Social media handles:
This is Ujjwal and today I have some beautiful mixed media masculine gift tags to share with you. Most of us struggle with masculine projects, I know I do, so I thought I would share how easy it was to make these tags using the Dress My Craft My Gentleman papers and punches.
Before I share the details on the project, I just wanted to share my social media handles so you can connect with me if you'd like to. You can easily find me at,
Blog: Handmade with Love
Facebook: Handmade with Love
Instagram: Handmade with Love
YouTube: Handmade with Love
These turned out so pretty and were really easy to make too. Here's a step by step tutorial on how to make your own masculine tags.
First, I chose a couple of papers from the My Gentleman 6"X6" papers pack, one for the base of the tags and one to add more layers. I cut one of the 6"X6" papers into 2 pieces, measuring 3"X6" using the Dress My Craft Trimmer. I used the 1.5" Circle punch to punch a few circles from the other 6"X6" paper.
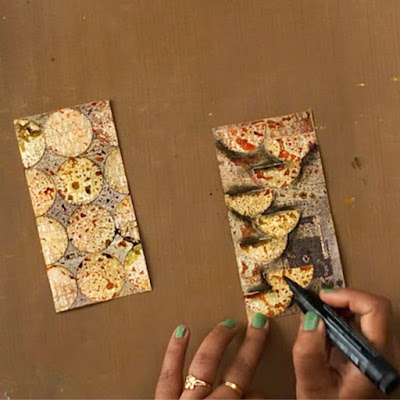
Next, adhere the punched circles in any pattern that you like. I chose a symmetrical pattern for one and cut the circles in half and adhered them randomly for the second.
Then, I used some distress sprays (Wild Honey, Shabby Shutters, and Dried Marigold) to add some color to the tags. I also used the Dress My Craft Kraft Mat here to protect my work surface.
Once the tags were dry, I used a PITT Artist brush marker pen to add details around the circles to make them pop up.
Next, using some copper modeling paste with the Ledger Script Stencil I added more texture.
Then, I used the 3-in-1 corner punch to round off the edges of the tag.
Finally, I used the My Gentleman motif sheet along with some twine to decorate the tags.
And that's it! I love how the tags came out. I hope you enjoyed the tutorial and will give it a try.
Products Used


Nice information thanks for sharing. Have you been planning to Buy Handmade Paper online? Well, Under the Sun Store is offering you the chance to buy premium quality handmade stationery products without any hassle. We offer our services all over the world. Visit us today!
ReplyDelete