Showing posts with label circle punches. Show all posts

Wednesday, 4 December 2019

Mixed Media Artist Trading Coins | Video Tutorial

Hola crafty peeps,

Video design team member Jaishree this side!

My Facebook - http://bit.ly/JK_FB

Today i am sharing with you all how to make a set of three artist trading coins mixed media style using the very gorgeous Whispering Love pattern paper from Dress My Craft.


I have used the amazing scalloped circle punch and the circle punch from dress my craft to create the bases of these trading coins. these punches are really handy and eliminate the need of die cutting for mass produce. Even the sizes of these punches are such that you can easily cut upto 2.5 inch scalloped circles and 2 inch regular circles. 
So without further a do let's dive into the tutorial right here - 


I hope you enjoyed watching this tutorial and are inspired to make your own mixed media artist trading coins using the punches and pattern papers from Dress My Craft.

Until Next Time
Happy Crafting
Jaishree Bansal
--

Products Used -
Products used - Non-Stick Craft Mat, Thick - http://bit.ly/2WAj8XH Whispering Love 12x12 Paper Pad - http://bit.ly/34dKGpj Fishnet Stencil - http://bit.ly/2Rt1KV5 Scalloped Circle Punch 2.5" - http://bit.ly/2DK3q4i Circle Punch 2" - http://bit.ly/2DHHC9g Clear Water droplets #3 - http://bit.ly/2V8v80W Clear Water Droplets #2 - http://bit.ly/32eOu8b
--
Dress My Craft, Social media handles:
--
Dress My Craft products are available at
For Indian customers -​www.crafterscorner.in
For International buyers - www.scrapbook.com

​www.dressmycraft.com​ (FREE SHIPPING ABOVE 150$ WORLDWIDE)

For wholesale or any queries please email us to info@dressmycraft.com 

Tuesday, 3 December 2019

Mixed Media Masculine Tags Feat. My Gentleman | Photo Tutorial

Hello there,


This is Ujjwal and today I have some beautiful mixed media masculine gift tags to share with you. Most of us struggle with masculine projects, I know I do, so I thought I would share how easy it was to make these tags using the Dress My Craft My Gentleman papers and punches.


Before I share the details on the project, I just wanted to share my social media handles so you can connect with me if you'd like to. You can easily find me at,

Blog: Handmade with Love
Facebook: Handmade with Love
Instagram: Handmade with Love
YouTube: Handmade with Love


These turned out so pretty and were really easy to make too. Here's a step by step tutorial on how to make your own masculine tags.

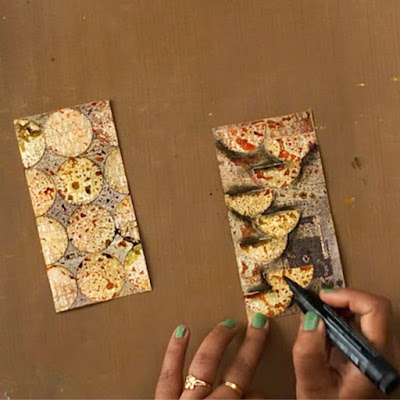
First, I chose a couple of papers from the My Gentleman 6"X6" papers pack, one for the base of the tags and one to add more layers. I cut one of the 6"X6" papers into 2 pieces, measuring 3"X6" using the Dress My Craft Trimmer. I used the 1.5" Circle punch to punch a few circles from the other 6"X6" paper.


Next, adhere the punched circles in any pattern that you like. I chose a symmetrical pattern for one and cut the circles in half and adhered them randomly for the second.


Then, I used some distress sprays (Wild Honey, Shabby Shutters, and Dried Marigold) to add some color to the tags. I also used the Dress My Craft Kraft Mat here to protect my work surface.


Once the tags were dry, I used a PITT Artist brush marker pen to add details around the circles to make them pop up.


Next, using some copper modeling paste with the Ledger Script Stencil I added more texture.


Then, I used the 3-in-1 corner punch to round off the edges of the tag.


Finally, I used the My Gentleman motif sheet along with some twine to decorate the tags.


And that's it! I love how the tags came out. I hope you enjoyed the tutorial and will give it a try.


Products Used


Dress My Craft, Social media handles:

Facebook: www.facebook.com/dressmycraft
Instagram: https://www.instagram.com/dressmycraft
Youtube: ​https://www.youtube.com/dressmycraft


Dress My Craft products are available at

For Indian customers -​www.crafterscorner.in 

For International buyers - www.scrapbook.comwww.dressmycraft.com​ ( FREE SHIPPING ABOVE 150$ WORLDWIDE)


Thursday, 10 October 2019

SWEET & FRUITY SHAKERS feat. new shaker elements

Hey there people! This is Crafter Anu (designer) at dress my craft.
I hope you all having a good crafty time. Today I have another crafty video to share.

In this video I am going to show you how to create these yummy shakers with newly launched shaker elements by dress my craft.

So lets have a look.


have a close look at the shakers here !
aren't they look yummy ??

watermelon slices shakers

carnival candies shaker

orange slices shaker

strawberry slices shaker

watch the full video tutorial here:


I hope you enjoy this video !
Do let me know how you like this video in the comments below :) 

Until then see you and happy crafting :)
Crafter Anu ♥️

Saturday, 14 September 2019

Romantic roses | A 3D house and an envelope

Hey guys, Meher here from Meher Creations. I am super excited, honoured and glad to continue my journey with Dress my craft for one more year along with such talented designers from all over the globe. 
You can find my work here:
Facebook: Meher Creations
Instagram: meher_creations

I've some beautiful projects to share with you today. As you all know Dress my craft is one of the best brands that manufactures the best and thick scrapbooking papers and they have launched the amazing Romantic roses paper collection recently. I must say this is the collection that took my breath away and I'm so much in love with it.
This paper pad comes in two different sizes. One is the 12*12 inches pad with 12 designs and 24 sheets. The other one is the 6*6 inches pad with 12 designs and 24 sheets. Both the sizes are equally useful for us as scrapbookers as we tend to create scrapbooks in different sizes as per our requirement.
The best thing about Dress my craft paper collections is the add on pack of motif sheet that contains some beautiful elements to fussy cut in order to create detailed projects.

A perfect house with a memory scrapbook for a wedding  | Romantic roses

My first project for today is a beautiful house with a memory scrapbook inside to preserve all beautiful memories. This is a 3D project created using 1200gsm chipboards to make it sturdy enough to hold a heavy scrapbook.
I've decorated the house with some mulberry flowers, charms, chipboard fence, bottles, pearls and elements from motif sheets.

Let's have a look..


Wedding envelope | Romantic roses

My second project for today is a money envelope that I created using the same romantic roses collection. I created a plain envelope using an envelope punch board and decorated it using romantic roses paper collection. I've again used some of my favorite elements from the motif sheet to give more detailing to it and I feel it makes such a beautiful and unique money envelope.


Products used:
Romantic roses collection
Romantic roses motif sheet
Floral oriental papers
Paper trimmer 12"
Paper trimmer 8.5"
Golden black sequins
Princes mix sequins
Mulberry flowers
Chipboard

Dress My Craft, Social media handles:
Facebook: www.facebook.com/dressmycraft 
Instagram: https://www.instagram.com/dressmycraft 
Youtube: ​https://www.youtube.com/dressmycraft


Dress My Craft products are available at

For Indian customers -​www.crafterscorner.in 
For International buyers - www.scrapbook.com
www.dressmycraft.com​ ( FREE SHIPPING ABOVE 150$ WORLDWIDE)


Happy Crafting!

Thursday, 22 August 2019

4 WAYS TO CRAFT WITH - CIRCLE PUNCHES

hey there people! This is Crafter Anu (designer) at dress my craft.
I hope you all having a good crafty time. Today i have another crafty video to share.

In this video i am going to show you how you can use the circle punches to create beautiful cards & decorative elements. so lets have a look.

 I have used Dress My Craft - Circle Punches
 These punches are just great and they cuts really well & neat.


 here's the video tutorial :


I hope you enjoy this video !
Do let me know how you like this video in the comments below :) 

Until then see you and happy crafting :)
Crafter Anu ♥️