Hello there,
This is Ujjwal and today I have some beautiful mixed media masculine gift tags to share with you. Most of us struggle with masculine projects, I know I do, so I thought I would share how easy it was to make these tags using the Dress My Craft My Gentleman papers and punches.
Before I share the details on the project, I just wanted to share my social media handles so you can connect with me if you'd like to. You can easily find me at,
Blog: Handmade with Love
Facebook: Handmade with Love
Instagram: Handmade with Love
YouTube: Handmade with Love




Dress My Craft, Social media handles:
This is Ujjwal and today I have some beautiful mixed media masculine gift tags to share with you. Most of us struggle with masculine projects, I know I do, so I thought I would share how easy it was to make these tags using the Dress My Craft My Gentleman papers and punches.
Before I share the details on the project, I just wanted to share my social media handles so you can connect with me if you'd like to. You can easily find me at,
Blog: Handmade with Love
Facebook: Handmade with Love
Instagram: Handmade with Love
YouTube: Handmade with Love
These turned out so pretty and were really easy to make too. Here's a step by step tutorial on how to make your own masculine tags.
First, I chose a couple of papers from the My Gentleman 6"X6" papers pack, one for the base of the tags and one to add more layers. I cut one of the 6"X6" papers into 2 pieces, measuring 3"X6" using the Dress My Craft Trimmer. I used the 1.5" Circle punch to punch a few circles from the other 6"X6" paper.

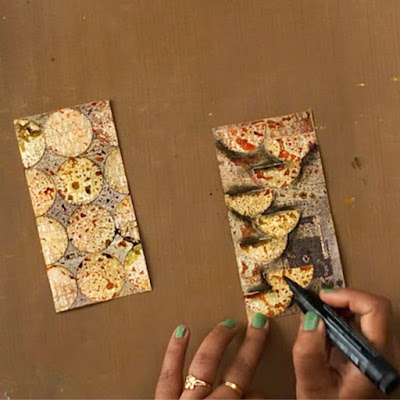
Next, adhere the punched circles in any pattern that you like. I chose a symmetrical pattern for one and cut the circles in half and adhered them randomly for the second.
Then, I used some distress sprays (Wild Honey, Shabby Shutters, and Dried Marigold) to add some color to the tags. I also used the Dress My Craft Kraft Mat here to protect my work surface.
Once the tags were dry, I used a PITT Artist brush marker pen to add details around the circles to make them pop up.
Next, using some copper modeling paste with the Ledger Script Stencil I added more texture.
Then, I used the 3-in-1 corner punch to round off the edges of the tag.
Finally, I used the My Gentleman motif sheet along with some twine to decorate the tags.
And that's it! I love how the tags came out. I hope you enjoyed the tutorial and will give it a try.

Products Used