Showing posts with label envelopes. Show all posts

Wednesday, 25 December 2019

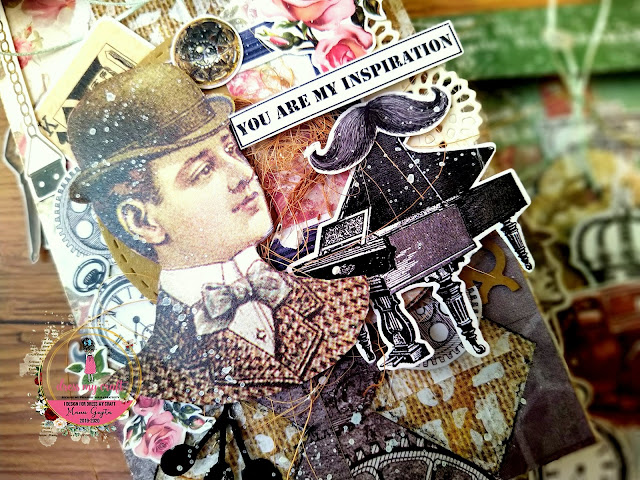
Mixed Media Masculine Envelopes : My Gentleman paper collection

Hello Crafty Folks,

I'm Manu, and I'm here today to share a Masculine theme project using the super masculine paper pack called ' My Gentleman' from Dress My Craft. Before I share the details of the project, I would love to share my social media handles in case you would wish to follow my work over at my channels.


You can find me at
FB: Manu Gupta
Youtube: Manu
Instagram: Manu.


I have used the one and only paper pack which is a true blue paper pack and meant to be for true blue. Believe me, this paper pack called "My Gentleman" from Dress My Craft is the GO-TO paper pack for all your masculine themed projects. The paper pack comes in two sizes, a 12*12 which is ideal for the scrapbookers and the 6*6 which is ideal for the card makers. It also comes along with two A4 size motif sheet which perfectly compliments the paper pack.

Along with the paper pack, I have used the awesome punches from Dress My Craft and the other papercraft tools.

Lets checkout the envelopes that I have done. It's always a dilemma of how to gift cash especially in the wedding and parties, and especially to men. Here's a tutorial on how you can make these envelopes easily. 


Thank you for being here till the end. 
Here is the video on how to make these here: 


Here are the product listing from the store.

1 My Gentleman - 12X12 Paper Pad https://www.dressmycraft.com/papers--cardstocks/dmcp2333
2 My Gentleman - 6X6 Paper Pad https://www.dressmycraft.com/papers--cardstocks/dmcp2344
3 My Gentleman Motif Sheet https://www.dressmycraft.com/papers--cardstocks/my-gentleman-motif-sheet
4 Reinforcement Hole Punch https://www.dressmycraft.com/punches/reinforcement-hole-punch
5 Circle Chain Border Punch https://www.dressmycraft.com/punches/dmct4724
6 Scalloped Border Punch https://www.dressmycraft.com/punches/scalloped-border-punch
7 Rounded Tag Punch https://www.dressmycraft.com/punches/rounded-tag-punch
8 Flower Pearls - Golden https://www.dressmycraft.com/glitters-gloss--crackle/dmcg2429
9 Micro Sparkling Dust - 30gm https://www.dressmycraft.com/glitters-gloss--crackle/micro-sparkling-dust-30gm
10 Satin Ribbon Twine - Red https://www.dressmycraft.com/fashion-accessories/dmcfa4243
11 Mini Paper Trimmer (2.5 inch X 6 inch) https://www.dressmycraft.com/paper-craft-tools/mini-paper-trimmer-2.5-inch-x-6-inch-1501
12 Multi-Purpose Scoring Board (12 inch X 12 inch) https://www.dressmycraft.com/paper-craft-tools/multi-purpose-scoring-board-12-inch-x-12-inch-1503

13 Paper Trimmer (6 inches X 12 inches) https://www.dressmycraft.com/paper-craft-tools/paper-trimmer


I hope you liked the project and until the next one, take care

Happy Crafting 
Manu 

Monday, 9 December 2019

Shaker envelope using Dress my Craft Punches

Hello Everyone, 

Again, Payal Bhalani here with Shaker Money Envelope using Dress My Craft Punches. In this project I used Whispering Love paper pad, Circle chain border punch and 2" circle punch from Dress My Craft.

My Instagram Artista_Payal
My Youtube Channel ARTista Payal

Here are some Photographs, check out the included details.


I used Whispering Love Paper collection for this beautiful Pink envelope. I also used 2" circle punch and Circle border chain punch form Dress my Craft to create shaker elements.


 I also used foliage and Leaves #8 dies to decorate my shaker envelope.


Thank you so much for scrolling along! I hope you enjoyed the creation. Don't forget to share your creation with us.
Youtube : ​https://www.youtube.com/dressmycraft


Dress My Craft products are available at

For Indian customers -​www.crafterscorner.in For International buyers - www.scrapbook.com
www.dressmycraft.com​ ( FREE SHIPPING ABOVE 150$ WORLDWIDE)
For wholesale or any queries please email us to info@dressmycraft.com 

Thursday, 10 October 2019

4 Projects Using the Pink Smoke Paper Collection

Hi Guys! 
Amanda Fitterer here with 4 different projects using the Pink Smoke Paper Collection!

Find me on Instagram: @craftyandcreativevibes
Subscribe to my YouTube channel: Amanda Fitterer


My first project is a Mood Tracker in my bullet journal:
I used the Vintage Hearts Stencil with distress ink for my background.  Then I started tearing out pieces of the Pink Smoke 6x6 paper pad and adhering them to my page.  I used the 2 smallest Five Petal Flower dies for my days of the week for my mood tracker.  I also cut some leaves and stems using the Foliage and Leaves #10 and #11 Dies.  I cut a blank tag from the Birthday Tags Die.


My 2nd project is a #10 envelope.  I fussy cut some flowers and a butterfly from the Pink Smoke 6x6 paper pad.  I cut a blank tag from the Birthday Tags Die.  I also cut some leaves and stems using the Foliage and Leaves #10 and #11 Dies.  I cut out all the flowers in the Five Petal Flower dies set.  Using the Groove Golf Tool set, I curled and embossed my blooms.  In the middle of my blooms, I put some glue down and put some White Flower Pearls inside.


My 3rd project is a card with some fun little critters inside.  I used the Pink Smoke 6x6 paper pad. I used the Five Petal Flower dies set for the front of my card.


My last project is a mini holder for my paperclip bookmarks.  I used the Pink Smoke 6x6 paper pad for the project, including the bookmarks.


Thanks for stopping by!  XOXO - Amanda

Here are the products used in these projects:
Vintage Hearts Stencil
Pink Smoke 6x6 Paper Pad
Five Petal Flower dies
Foliage and Leaves #10 and #11 Dies
Birthday Tags Die
Groove Golf Tool set


Dress My Craft:
Facebook: www.facebook.com/dressmycraft
Instagram: https://www.instagram.com/dressmycraft
Pinterest:  https://pinterest.com/dressmycraft

Dress My Craft products are available at:
For Indian customers - www.crafterscorner.in
For international buyers - www.scrapbook.com

www.dressmycraft.com (FREE SHIPPING ABOVE $150 WORLDWIDE)
For wholesale or any queries, please email us: info@dressmycraft.com


Saturday, 14 September 2019

Romantic roses | A 3D house and an envelope

Hey guys, Meher here from Meher Creations. I am super excited, honoured and glad to continue my journey with Dress my craft for one more year along with such talented designers from all over the globe. 
You can find my work here:
Facebook: Meher Creations
Instagram: meher_creations

I've some beautiful projects to share with you today. As you all know Dress my craft is one of the best brands that manufactures the best and thick scrapbooking papers and they have launched the amazing Romantic roses paper collection recently. I must say this is the collection that took my breath away and I'm so much in love with it.
This paper pad comes in two different sizes. One is the 12*12 inches pad with 12 designs and 24 sheets. The other one is the 6*6 inches pad with 12 designs and 24 sheets. Both the sizes are equally useful for us as scrapbookers as we tend to create scrapbooks in different sizes as per our requirement.
The best thing about Dress my craft paper collections is the add on pack of motif sheet that contains some beautiful elements to fussy cut in order to create detailed projects.

A perfect house with a memory scrapbook for a wedding  | Romantic roses

My first project for today is a beautiful house with a memory scrapbook inside to preserve all beautiful memories. This is a 3D project created using 1200gsm chipboards to make it sturdy enough to hold a heavy scrapbook.
I've decorated the house with some mulberry flowers, charms, chipboard fence, bottles, pearls and elements from motif sheets.

Let's have a look..


Wedding envelope | Romantic roses

My second project for today is a money envelope that I created using the same romantic roses collection. I created a plain envelope using an envelope punch board and decorated it using romantic roses paper collection. I've again used some of my favorite elements from the motif sheet to give more detailing to it and I feel it makes such a beautiful and unique money envelope.


Products used:
Romantic roses collection
Romantic roses motif sheet
Floral oriental papers
Paper trimmer 12"
Paper trimmer 8.5"
Golden black sequins
Princes mix sequins
Mulberry flowers
Chipboard

Dress My Craft, Social media handles:
Facebook: www.facebook.com/dressmycraft 
Instagram: https://www.instagram.com/dressmycraft 
Youtube: ​https://www.youtube.com/dressmycraft


Dress My Craft products are available at

For Indian customers -​www.crafterscorner.in 
For International buyers - www.scrapbook.com
www.dressmycraft.com​ ( FREE SHIPPING ABOVE 150$ WORLDWIDE)


Happy Crafting!

Tuesday, 20 August 2019

Envelope Flip-book Album

Hola crafty peeps,

Design team member Jaishree this side!

Today I will be sharing with you all a process tutorial on how to make an envelope flipbook album using Dress My Craft's Floral Symphony pattern paper.


This flip-book album is a great way to store your memories from a particular event and makes for a fabulous gift too. Even though I have used Floral Symphony pattern paper for this, you can use any pattern paper from dress my craft and customize as per your requirement. 

Let's dive into the tutorial right here - 


I hope you enjoyed watching this tutorial and are inspired to make your own altered hoops. Do share your creations by tagging us on social media we love to see them. 

Until Next Time 
Happy Crafting
Jaishree Bansal

--

Supplies Used - 

Floral Symphony 12x12 - http://bit.ly/2WuCjlk Non Stick Craft Mat Thick - http://bit.ly/2WAj8XH Multi Purpose Score Board - http://bit.ly/2J3MmLf Teflon Bone Folder #3 - http://bit.ly/303Tb4z Floral Symphony Motif Sheet - http://bit.ly/2LskbHZ Corner Slot Punch - http://bit.ly/2Jmxgjb Circle Dot Border Punch - http://bit.ly/2V6gjfo Rounded Tag Punch - http://bit.ly/2vJ8amM Shabby Chic Sequence - http://bit.ly/2V66caf Vintage Lace White #3 - http://bit.ly/2vFKsb5 Clear Water Droplets 3 - http://bit.ly/2V8v80W Tropical Swirls Die - http://bit.ly/2YcOcwY Foliage and Leaves #6 Die - http://bit.ly/2Jmpl5v Hugs and Kisses Die - http://bit.ly/2H2hwzf Classic Doily Die - http://bit.ly/2LtuueZ

Friday, 31 May 2019

Unicorn Galore and lined envelopes + tutorial

Hello Crafty Folks,

We have Crafty Feast -4 coming up and I'm sure you all must be excited to be a part of this grandest crafty event ! If you are still in a doubt, shed all your doubts and book your tickets to the event here! You will not be disappointed and this event is a must to attend if you are looking forward to learn advance decoupage techniques and if you want to take your decoupage techniques to the next level.

I'm here today sharing a super cute rosette fan using the super gorgeous papers from the Magical Unicorn paper pack. 
I also have a tutorial on how I made this two toned rosette. Lets check the complete project before heading to the tutorial.


I totally loved making this one and lets check out on how to make this !


1. Take two complimentary sheets from the Magical Unicorn paper pack and cut in 12*6 inches for both the sheets. Now score at 1 inch interval at all the 4 panels obtained. 


2. Now paste the sheets along the lines marked at the one inch interval to get the shape as in above.


3. Use Dress my craft embellishments and the journalling card from the paper pack to embellish your rosette fan .

Here are some of the pics.


Lets move to the next project. Lined envelopes. 
The best part about the dress my craft Scoreboard is that it comes along with the envelope maker and the envelope maker has dimensions listed to make the envelopes, boxes and envelope boxes. This makes life so much easier and I love using the envelope maker that comes to make small envelopes for my baby albums!

I've made a few lined envelopes and they look so pretty.


To make these envelops, these measure 3*3 inches.

1. To make an envelop of 3.5 inches, take a cardstock panel measuring 6*6 inches. Now keep the envelope maker aligned with the 12 inches mark on the scoreboard and score at 3 inches (carefully check the dimensions mentioned on the envelope maker to check the size of the envelop you want to make along with the points at where you need to do the scorelines. 
Now rotate the paper and score all the 4 sides.


2. Fold along the creases and take a pattern paper measuring 3*3 inches and place it inside of the envelop. 
Decorate it with a little lace in your stash. 
Your lined envelope is ready!


Thank you for staying with me till the end and I hope you do like the projects.


Products used from the store:


1. MAGICAL UNICORN - 12" X 12" 
2. Unicorn die cut
3. Magical Unicorn Motif Sheet
9. NESTING CIRCLES - BASIC 
10. POINTED DAISY FLOWER - 
11. Ultimate Die Cleaning Tool


Happy Crafting
Manu