Showing posts with label Little miracle. Show all posts

Saturday, 21 September 2019

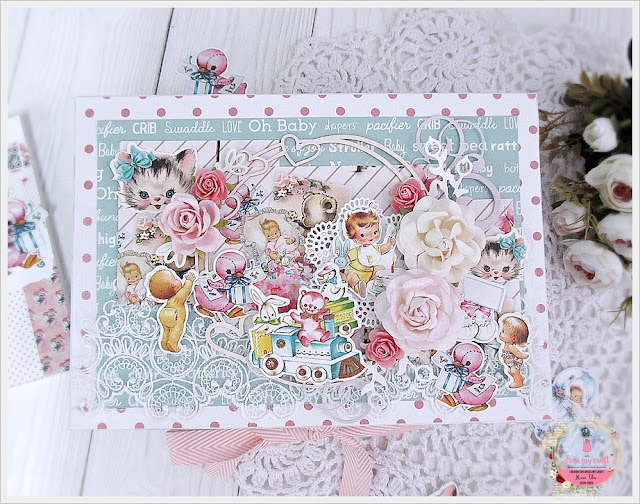
Baby treasure box - Little miracles

Hello Friends,
Kavitha here today.I am sharing a super cute baby project made with  "Little miracles" paper pad.
You can find me on my
Blog : https://kalalayaa-artclub.blogspot.com/
Instagram : https://www.instagram.com/s_kavi/

The paper pad is absolutely delightful to work with and the color palette is perfect for both boy and girl.I made a treasure box with multiple boxes inside which works as a perfect keepsake to store tiny treasures about the baby.The coordinating die cuts are super cute and makes the work very easy.I decorated the box with lots of die cuts and dies from Dress my craft


Products used:
Little miracle  12*12 paper pad
Little miracle  6*6 paper pad
Little miracle die cuts
Classic doily die
Foliage and leaves die
Tropical swirls die
Corner slot punch 

Happy crafting,
Kavi

Dress My Craft, Social media handles:
Facebook : www.facebook.com/dressmycraft 
Instagram : https://www.instagram.com/dressmycraft 
Youtube : ​https://www.youtube.com/dressmycraft


Dress My Craft products are available at

For Indian customers -​www.crafterscorner.in 
For International buyers - www.scrapbook.com

www.dressmycraft.com( FREE SHIPPING ABOVE 150$ WORLDWIDE)

Tuesday, 20 August 2019

Altered Baby Keepsake Box

Hello beautiful crafters,

Design team member Jaishree this side!

And today I have here for you a very cute baby project. I have altered a small box and converted it into a baby keepsake box using Dress My Craft's Little Miracle pattern paper and die cuts.


One can use this box for both baby boy and baby girl as the pattern paper in itself is composed of neutral shades suited for both genders. You can store pictures, small baby products and much more in this box. It makes for a great gift box as well for a baby shower present.
So without further wait here's the process video tutorial on how to make this box, Enjoy!


I hope you enjoyed watching this tutorial and are inspired to make your own altered hoops. Do share your creations by tagging us on social media we love to see them. 

Until Next Time 
Happy Crafting
Jaishree Bansal

--

Supplies Used - 

Paper Trimmer - http://bit.ly/2ZdhVGi Thick Non-Stick Craft Mat - http://bit.ly/2WAj8XH Little Miracle 12x12 Pattern Paper - http://bit.ly/2LbBjR5 Little Miracle Die cuts - http://bit.ly/2HFDSIv Thumb Print Stencil - http://bit.ly/2G01ma2 Foliage & Leave No.6 Die Set - http://bit.ly/2Jmpl5v Green Satin Twine - http://bit.ly/2WcGLsp Crystal Clear Sequence - http://bit.ly/2FZbDmC


Tuesday, 9 April 2019

Scoreboard ideas : Rosettes + Cake in a box with tutorials

Hello Crafty Folks,

It's another month already and I hope you must have enjoyed the wide variety of projects that were showcased by our uber talented DT's in the month of March '19. This month is all about the gadgets and we would be showcasing how and what kind of projects we can use using the scoreboard and the bone folders.
Dress My Craft has launched it's very own Made in India scoreboard and definitely a crafters life is sorted out once we start using the Dress My Craft scoreboard. Along with the scoreboard, Dress My Craft has also launched the bone Folders in different shapes and for different purpose and I bet, you will be amazed to find the quality and the quality work that they do.

I'm focussing on the Dress My Craft Scoreboard in this post and will be showcasing 2 projects that you can make using the scoreboard. The first are rosettes and the second is the very vital part of my Explosion boxes, the Cakes!!

Lets checkout the Cake in the box first.


Looks nice, isn't it??
 I have a tutorial on how I did the inside cake for this cake in a box!

Lets get started.

1. Take a 9*9 inch cardstock and score at 3 inches and 6inches. now turn the paper and again score at 3 inches and 6 inches. 
2.  Now cut 4 sides at one angle and then shape it in the form of a box.  For the pattern papers, cute 16 pieces measuring 2.75*2.75 inches and adhere at the front and the back of the box.
3. To make the lid of the box, take a cardstock of size 5.1 *5.1 inch and score at 1 inches from all the sides. Overlap the end panels to make the lid of the box.
4. To make the cake, Take 2 cardstock pieces measuring 4*4 inches and 3.5*3.5 inches. Score at .75 from all the sides in both the panels and form the lid shape for both. Now stack them both onto one another to make the cake shape.
Dress My Craft scoeboard sure makes the life super simpler and a scoreboard is a basic tool that is a must have in your tool list if you are thinking about venturing into crafts!


Now embellish your box as your heart desires!! I kept the box simple and neat to highlight the super cute Unicorns from the Magical Unicorn paper pack along with the pretty papers. Lets checkout a few more pics from the box!


I love love love making explosion boxes for the simple fact that they have THAT surprise element inside in the shape of a cake and it truly makes someone cry with delight when the box is first opened up! Well, who doesn't loves surprises!! 

My next project is another party stunner and one can make these rosettes in any size to add that extra oomph and glamour in any party!! 


Don't they look super nice and these rosettes can be pretty much made for any occasion, be is a birthday party or a naming ceremony party, they sure are to become a stunner for any of the occasion.

To make these rosettes.
1. Take 2 pieces of  3*12 inch pattern paper and score at an interval of .5 inch till the end for both the pattern papers.
2. Now make the accordation for both the pattern paper and adhere the end point of one to the beginning of the second to make the accordation into a big one. Now seal the ends and press it in the middle with your palm. Use a circular cut out using the super powerful circle punches by Dress my Craft to adhere the circle to the center. (This takes a little time and use a Glue gun to do this part of the rosette, but be careful and don't let the hot glue gun touch your palm).


I made my rosette in 3 sizes. 
3*12 inches, 2.5*12 inches and 1.75 *12 inches. Below is a picture on how I embellished the rosettes using the Little miracle die cuts!


 I hope you all liked these usage of the Dress My Craft scoreboard and would want to try them out. Be on a lookout for more such inspirations from the Design Team members. 

Products used from the store:

1. MAGICAL UNICORN - 12" X 12" 
2. Unicorn die cut
3. Magical Unicorn Motif Sheet
9. NESTING CIRCLES - BASIC 
10. POINTED DAISY FLOWER - 
11. Ultimate Die Cleaning Tool

DMC products are available at www.crafterscorner.in for India customers and at www.dressmycraft.com for the International customers.

Facebook : www.facebook.com/dressmycraft

                                  Orders over 150$ are eligible for Free shipping internationally. 


Happy Crafting!
Manu

Sunday, 17 March 2019

Little Miracle baby photo book ---First Year

Hello friends,

This is Anita here with a new post for you today !!!

Babies are a delight and one can never get tired of them. The moments you spend with them are so relaxing and joyful that you want to cherish them forever. So how about capturing those joyous moments of your little one in the form of a photo book.
In this book , you can record all the milestones of your little ones and cherish those moments forever.
Photo book is a quick and easy to store photos and are so versatile that you can change pictures, create journals and add so much more.
These can be made by any level of  Crafter , even beginners and require not much skill.

The Dress My Craft products even make the task easy as the wonderful papers are so sturdy that they are perfect to make such projects and that too without any card stock .
The punches and the paper tools help you to get perfect results each time .
So let us make these photo folios or photo books and treasure the memories of your little baby or gift them away .

For my project , I am using the Little Miracle paper pack along with the die cuts . Yes !!! You got it  right !!! This paper pack comes with pre cut motifs and that saves your time from fussy cutting . And the way  I have designed it, there is very little wastage of paper. In fact you can make two such books from one 12x12 paper pack . Add fancy borders using the beautiful lace punches or add tags using the tag punches, these tools are really time saviours

So make a collection of such books for every month. I have created one which holds memories and photos for 12 months . So we have a page for each month with space for writing special notes for that month .

So let me show you how this book looks like .


Here is the photo tutorial for making the album .

Gather  all the materials for making the album .


 Cut 12 pieces for pattern paper --5.5" x 5.5"
6 pieces ---11.75" x 5.75


Cut chip board 6" x 6" -2 pieces and 3" x  6"
And assemble like this using masking tape.


Score the bigger piece at 5 3/4 inch and 6inch .


Products used


Other supplies 
Masking tape, Red 1/2 inch tacky tape, Distress Ink Aged Mahogany

See my other post here 

DMC products are available at www.crafterscorner.in for the Indian customers and at www.dressmycraft.com for the International customers.

Dress My Craft, Social media presence:
FACEBOOK:
www.facebook.com/dressmycraft
INSTAGRAM:
https://www.instagram.com/dressmycraft
LIVE FACEBOOK VIDEOS:
https://www.facebook.com/crafterscornerlivetv
YOUTUBE:
https://www.youtube.com/channel/UCExYyDP3Ag_uJk1MkxRz38w

Orders over 150$ are eligible for FREE SHIPPING INTERNATIONALLY.


Saturday, 9 March 2019

Flip Fold album using the Little Miracle paper pack + tutorial

Hello Crafty Folks,

Manu here with another Folded album tutorial to share with you.
I truly love making albums which I believe is the perfect way to keepsafe all those lovely memories of all the cherished moments and to cherish them always and forever!
I'am also a big fan of the Dress My Craft dies and love using the same in my projects. The dies are super crisp and they cut like ease and the designs are amazing!

I have a Folded album tutorial to share with you today! It's fairy easy to make this one and all you need is a cardstock, your pattern papers and the embellishments to crack up one easy album in just a couple hours!

** To checkout the complete list of the materials used for making this flip album, kindly checkout the product list as mentioned at the end of this post.


Here is a little glimpse of the album.


I hope you are all excited and this little snippet has surely inspired you all to checkout the complete album.

Lets checkout on how to make this album.

1. Take a cardstock measuring 14*10/5 inches and score it at an interval of 3.5 both vertically and horizontally.


2. Additionally, at the first middle of the 3.5" section, further score it at an interval os 1.75" on both the first and the last section.

3. Now fold across as shown in the below image.


4. This fold is how the booklet album will close up. Now take 2 chipboard measuring 10.75*3.75 and cover these with the pattern paper of your choice from the paper pack.


5. Here is a little teaser of the in-progress of the album, once I had cutted out all the inside panels and pasted them.


Now comes the most exciting part for me and this is embellishing the album. Dress My Craft dies and the papers makes this part such an easy one and it's pretty much fun doing all the mix and match and make the album!

Checkout the complete album below.


Below is the complete view of the album followed by some close snapshots!


The Dress My Craft dies are a total boon and they make and jazz up the projects to another level all together!


Checkout the gorgeous leaves dies from Dress My Craft, these dies are my current favorite.


I love how the lovely Dress My Craft papers create miracle, true to the paper collection that I used.


I'm sure that you all must have been inspired enough to try out this magnificent paper pack and I'm sure that this paper pack will truly bring out the best in your projects.

Products used from the store.
1. Little miracle paper pack 12*12
2. Little Miracle Motif sheet
3. Little Miracle Die cuts
4. Multi-Purpose Scoring Board (12 inch X 12 inch)
5. Premium White Cardstock - 240 GSM
6. Foliage & Leaves # 12 - Flower Making Cutting Dies
7. Foliage & Leaves # 7 - Flower Making Cutting Dies
8. NESTING CIRCLES - BASIC 
9. Floral Sentiments - Faith & Dream - Sentiment Dies


DMC products are available at www.crafterscorner.in for India customers and at www.dressmycraft.com for the International customers.

Facebook : www.facebook.com/dressmycraft

                                  Orders over 150$ are eligible for Free shipping internationally. 


Happy Crafting!
Manu