Showing posts with label tutorials. Show all posts

Wednesday, 27 November 2019

Christmas Cards feat. Christmas bells collection | Meher

Hey guys,
I hope you are doing great. This is Meher from Meher creations.

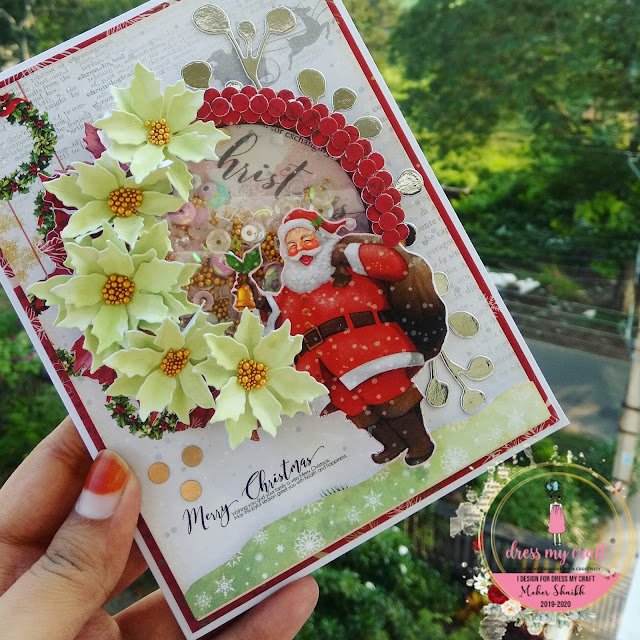
Today I am back with a new post for this month and since it is November we are getting some Christmas projects for you to create some beautiful Christmas gifts well in advance for your friends and family. Before I go ahead I must say that these Christmas bells papers are super awesome in terms of quality and designs especially the jounaling cards. I really feel they add so much of detailing to any project. I truly enjoyed working with these papers.
Flower making is always a fun thing to do and after a very long time I tried my hands on some handmade flowers using the Christmas flower dies again from dress my craft. I coloured the petals using lime green chalk edger, folded each petal and layered it on top of each other to create a flower. I created 5 flowers and added some golden micro beads at the centre to complete them. The center of the card is a circle shaker panel on which I attached these flowers. The circle shaker is created using a chipboard and filled with pink celebration sequins and micro beads.
The second card has the silver base with a pattern paper. I created some vellum pockets and inserted some journaling tags in it. I ended up decorating the card with some Christmas die cuts and fussy cutting from the collection.

Let's have a look at the cards..


List of materials used:
Christmas bells collection
Christmas dies
Christmas tree dies
Foliage leaves dies
Golden sequins
Micro beads
Pink celebration sequins

Thank you for stopping by and I hope you liked my projects.

Dress My Craft, Social media handles:
Youtube : ​https://www.youtube.com/dressmycraft


Dress My Craft products are available at

For Indian customers -​www.crafterscorner.in For International buyers - www.scrapbook.com
www.dressmycraft.com​ ( FREE SHIPPING ABOVE 150$ WORLDWIDE)
For wholesale or any queries please email us to info@dressmycraft.com 

Saturday, 16 November 2019

Christmas Card | Video tutorial by Meher

Hey guys,
I hope you are doing great. This is Meher from Meher creations.

I've a beautiful Christmas card with a complete video tutorial to share with you today. I have used the Christmas bells collection and Christmas dies from Dress my craft to create this card. The Christmas tree is a shaker vellum panel with some glitter chunks in it. You will see me creating this card with Easy cuts die cutting machine and I hope you like it.
Scroll down to find the video.


Here is a video tutorial link

List of materials used:
Christmas bells collection
Christmas tree dies
Golden sequins
Micro beads

Thank you for stopping by.

Dress My Craft, Social media handles:
Youtube : ​https://www.youtube.com/dressmycraft


Dress My Craft products are available at

For Indian customers -​www.crafterscorner.in For International buyers - www.scrapbook.com
www.dressmycraft.com​ ( FREE SHIPPING ABOVE 150$ WORLDWIDE)
For wholesale or any queries please email us to info@dressmycraft.com 

Friday, 19 April 2019

Get creative with dress my craft scoreboard | Tutorial

Hello everyone,
Hope you are doing great.
This is Meher from Meher Creations back with another post on different ways you can use Dress my craft scoreboard. We are focusing on scoreboard and bone folders this month to show you different possibilities on how you can use them.
Well, In this post I will be sharing some creative ways in creating textures on cards and other projects.


1. Layered card with shaker window


2. Card with a bunch of grapes

How to create:
  • Create a card measuring 4*6 inches on a white cardstock.
  • Cut a piece of pattern paper measuring 3.5 by 5.5 inches.
  • Cut a piece of cardstock again measuring 3 1/4 by 5 1/4 inches. Score the whole cardstock at every 1/8 inch to give a nice texture.
  • Pick a yellow pattern paper and cut a window panel on it and adhere foam tape behind. 
  • Layer all the pieces together.
  • Apply some equal amount of glue at the center of the card and start arranging round pearls randomly to give a natural grapes look.
  • Pick some leaf chipzeb pieces and color them in green using Prima chalk edgers.
  • Stick them on top of the bunch and tie a bow using twine.
  • Add a sentiment and complete your card. 


3. Banner Card

How to create:
  • Create a base card measuring 5*4 inches.
  • Pick the cover of the charming baby girl paper pad and cut some colorful glossy pieces to create banner. 
  • Adhere a piece of twine on the card and allow it to dry. 
  • Stick foam tape behind all the tiny banner pieces and adhere it on to the card.
  • Add a sentiment or a stamped image to complete the card.


4. Pocket envelope

How to create:
  • Create a base card measuring 4*6 inches.
  • Score at 1/4 inch on both the sides
  • Cut a strip from one part of the card.
  • Score at 1.5 inch to fold the envelope.
  • Stick the 1/4 inch area on to the other side of the card. That makes a pocket envelope.
  • Cut pattern papers and adhere it on the envelope.
  • Pick two brads and fix it at the centre of the envelope and tie a twine to make the closure.
  • Pick some images from the motif sheet and embellish it using foam tape. Add a sentiment to complete the envelope and fill some tags in it.


List of materials used: 
DMC products are available at: 
www.crafterscorner.in for India customers and at www.dressmycraft.com for the International customers.

Facebook : www.facebook.com/dressmycraft
Instagram : https://www.instagram.com/dressimycraftLIVE Facebook Videos: https://www.facebook.com/crafterscornerlivetvYoutube : https://www.youtube.com/channel/UCExYyDP3Ag_uJk1MkxRz38w

Orders over 150$ are eligible for Free shipping internationally.

Saturday, 9 March 2019

Flip Fold album using the Little Miracle paper pack + tutorial

Hello Crafty Folks,

Manu here with another Folded album tutorial to share with you.
I truly love making albums which I believe is the perfect way to keepsafe all those lovely memories of all the cherished moments and to cherish them always and forever!
I'am also a big fan of the Dress My Craft dies and love using the same in my projects. The dies are super crisp and they cut like ease and the designs are amazing!

I have a Folded album tutorial to share with you today! It's fairy easy to make this one and all you need is a cardstock, your pattern papers and the embellishments to crack up one easy album in just a couple hours!

** To checkout the complete list of the materials used for making this flip album, kindly checkout the product list as mentioned at the end of this post.


Here is a little glimpse of the album.


I hope you are all excited and this little snippet has surely inspired you all to checkout the complete album.

Lets checkout on how to make this album.

1. Take a cardstock measuring 14*10/5 inches and score it at an interval of 3.5 both vertically and horizontally.


2. Additionally, at the first middle of the 3.5" section, further score it at an interval os 1.75" on both the first and the last section.

3. Now fold across as shown in the below image.


4. This fold is how the booklet album will close up. Now take 2 chipboard measuring 10.75*3.75 and cover these with the pattern paper of your choice from the paper pack.


5. Here is a little teaser of the in-progress of the album, once I had cutted out all the inside panels and pasted them.


Now comes the most exciting part for me and this is embellishing the album. Dress My Craft dies and the papers makes this part such an easy one and it's pretty much fun doing all the mix and match and make the album!

Checkout the complete album below.


Below is the complete view of the album followed by some close snapshots!


The Dress My Craft dies are a total boon and they make and jazz up the projects to another level all together!


Checkout the gorgeous leaves dies from Dress My Craft, these dies are my current favorite.


I love how the lovely Dress My Craft papers create miracle, true to the paper collection that I used.


I'm sure that you all must have been inspired enough to try out this magnificent paper pack and I'm sure that this paper pack will truly bring out the best in your projects.

Products used from the store.
1. Little miracle paper pack 12*12
2. Little Miracle Motif sheet
3. Little Miracle Die cuts
4. Multi-Purpose Scoring Board (12 inch X 12 inch)
5. Premium White Cardstock - 240 GSM
6. Foliage & Leaves # 12 - Flower Making Cutting Dies
7. Foliage & Leaves # 7 - Flower Making Cutting Dies
8. NESTING CIRCLES - BASIC 
9. Floral Sentiments - Faith & Dream - Sentiment Dies


DMC products are available at www.crafterscorner.in for India customers and at www.dressmycraft.com for the International customers.

Facebook : www.facebook.com/dressmycraft

                                  Orders over 150$ are eligible for Free shipping internationally. 


Happy Crafting!
Manu

Saturday, 9 February 2019

Squash book using the Magical Unicorns paper pack + Tutorial

Hello Crafty Folks,

This is Manu and I'm excited to share a  new cute little mini album with you today.
This album has a different structure and it is a lovely one.

I have used the newly launched paper pack called Magical Unicorn which comes in a 12*12 and a 6*6 size along with the Motif sheet. The best part about this collection is that for those who dislike the fussy cutting, there is an option of buying the die cuts (of course of the motif sheet) as a seperate part and leave the hassle of doing the fussy cutting all the way long.
The die cuts are also an easier way of saving a lot of time, but I do love fussy cutting and I totally love fussy cutting with my scissors.

I also have a little tutotial on how to make the base of this squash mini album and Lets checkout how this album looks like.


Above is the closed look of the album. I have kept the front relatively simple to highlight the pretty colors and the uber cute Unicorn from the die cuts pack. I totally loved the Unicorns from this paper pack.


 And here is the complete look when this album is opened up. The album looks teeny tiny at the first look, but once opened up, it has ample of space for writing down messages and putting up the pics.

The best part, I have put up a little flaps on two of the insides, which once opened up reveals more space. We would look into those later on in the pictures, lets first head over to the part where I show how to make the base structure of this little mini album.

** The list of all the products used have been listed at the bottom of this project and you may want to checkout the complete list. If there is anything you may need an answer for, please drop in a comment and I will make sure to reply back. **

Lets start.

1.

Take 3 cardstock pieces of 8.5*8.5 inches and score at 4.25 and 4.25 from both the sides resulting in a intersecting scoring as in the picture below.
Also score at one diagonal point to another as shown in the picture below ( From end to end).


Now you will be having 3 pieces of 8.5*8.5 inch cardstock as in the pic above. Carefully fold the cardstock inwards where there is a diagonal scoring to make it easy to fold the complete card later on.


Now place your pieces together as in the pic above and tape the intersecting square together. Remember to place the middle cardstock on top of the first and the third cardstocks. 
Once the interesting portions have been glued together, Fold the first cardstock inwards, the second outwards and the third again inwards to fold it together.

Once this base structure is done, run your imagination wild and embellish the insides in the way you wish to.
Here are some of the snapshots of the insides of this little mini the way I did. 


I loved the bubbly colors this collection had to offer and used a lot of die cuts from the die cut element pack to embellish this little mini. 


To peck up things, I also kept  a little flap that opens up and tied it with a funky looking thread. This insert when opens up can hold pictures and looks like the way it looks in the picture below.


The Newly released Dress My Craft dies adds a additional charm to the project.


Now that's a lot of pictures, I loved clicking the pics from all the sides and truly loved the true blue colorful and cheerful look this album has.


I hope you liked this little mini of mine and have been inspired to make one for yourself. 

Products Used:
9. NESTING CIRCLES - BASIC 
10. POINTED DAISY FLOWER - 
11. Ultimate Die Cleaning Tool

DMC products are available at www.crafterscorner.in for India customers and at www.dressmycraft.com for the International customers.

Facebook : www.facebook.com/dressmycraft

                                  Orders over 150$ are eligible for Free shipping internationally.