Showing posts with label dressmycraft scoring tool. Show all posts

Friday, 19 April 2019

Get creative with dress my craft scoreboard | Tutorial

Hello everyone,
Hope you are doing great.
This is Meher from Meher Creations back with another post on different ways you can use Dress my craft scoreboard. We are focusing on scoreboard and bone folders this month to show you different possibilities on how you can use them.
Well, In this post I will be sharing some creative ways in creating textures on cards and other projects.


1. Layered card with shaker window


2. Card with a bunch of grapes

How to create:
  • Create a card measuring 4*6 inches on a white cardstock.
  • Cut a piece of pattern paper measuring 3.5 by 5.5 inches.
  • Cut a piece of cardstock again measuring 3 1/4 by 5 1/4 inches. Score the whole cardstock at every 1/8 inch to give a nice texture.
  • Pick a yellow pattern paper and cut a window panel on it and adhere foam tape behind. 
  • Layer all the pieces together.
  • Apply some equal amount of glue at the center of the card and start arranging round pearls randomly to give a natural grapes look.
  • Pick some leaf chipzeb pieces and color them in green using Prima chalk edgers.
  • Stick them on top of the bunch and tie a bow using twine.
  • Add a sentiment and complete your card. 


3. Banner Card

How to create:
  • Create a base card measuring 5*4 inches.
  • Pick the cover of the charming baby girl paper pad and cut some colorful glossy pieces to create banner. 
  • Adhere a piece of twine on the card and allow it to dry. 
  • Stick foam tape behind all the tiny banner pieces and adhere it on to the card.
  • Add a sentiment or a stamped image to complete the card.


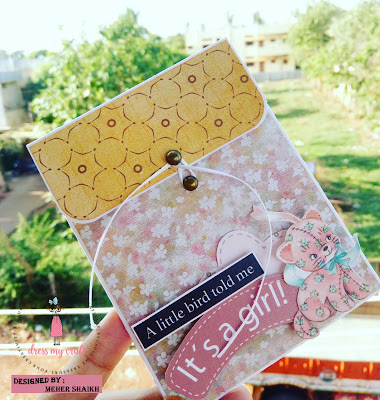
4. Pocket envelope

How to create:
  • Create a base card measuring 4*6 inches.
  • Score at 1/4 inch on both the sides
  • Cut a strip from one part of the card.
  • Score at 1.5 inch to fold the envelope.
  • Stick the 1/4 inch area on to the other side of the card. That makes a pocket envelope.
  • Cut pattern papers and adhere it on the envelope.
  • Pick two brads and fix it at the centre of the envelope and tie a twine to make the closure.
  • Pick some images from the motif sheet and embellish it using foam tape. Add a sentiment to complete the envelope and fill some tags in it.


List of materials used: 
DMC products are available at: 
www.crafterscorner.in for India customers and at www.dressmycraft.com for the International customers.

Facebook : www.facebook.com/dressmycraft
Instagram : https://www.instagram.com/dressimycraftLIVE Facebook Videos: https://www.facebook.com/crafterscornerlivetvYoutube : https://www.youtube.com/channel/UCExYyDP3Ag_uJk1MkxRz38w

Orders over 150$ are eligible for Free shipping internationally.

Monday, 1 April 2019

Little miracle name plate | How to create

Hello everyone,
Meher this side from Meher Creations with a new project created using the little miracle paper collection from Dress my craft.

I've created a huge name plate that measures 20 inches. Let me take you through the process on how I created.

I painted the base using home decor chalk paint and attached a couple of pattern papers from little miracle collection trimming them in different sizes using tacky glue. I have done some gold stenciling using my favourite stencil from Dress my craft and varnished the whole name plate. I picked some mulberry flowers and attached them on two sides of the name plate. In order to add some extra flavour I ended up sprinkling some Dress my craft sparkling dust on all the flowers.
I picked the alphabets and coated them with white gesso and then colored them in my most favorite color using Prima chalk edgers. I pretty much liked the combination. I proceeded further giving some extra touch up for the letters and varnished them. Finally I added some butterflies, clear droplets and other embellishments to complete the name plate. I had a beautiful pink shabby chic lace which I ended up attaching all over the border of the name plate.

Have a look on how it turned out!!


List of materials used:
Little miracle paper collection 
Dmc stencil
Sparkling dust
Clear droplets
Roses
Frosted powder

DMC products are available at: 
www.crafterscorner.in for India customers and at www.dressmycraft.com for the International customers.

Facebook : www.facebook.com/dressmycraft
Instagram : https://www.instagram.com/dressimycraftLIVE Facebook Videos: https://www.facebook.com/crafterscornerlivetvYoutube : https://www.youtube.com/channel/UCExYyDP3Ag_uJk1MkxRz38w

Orders over 150$ are eligible for Free shipping internationally.

Saturday, 23 February 2019

Basic Envelope Making and elegant money wraps

Hello friends

This is Anita here with loads of new techniques for you. I love playing around with new tools and keep finding something more than that product can offer .
So here I am with the new dies from Dress My Craft . The month of January saw many new releases in dies and all of them are wonderful that they will make all Crafters happy whether card makers or scrapbookers .
I am especially fond of making money wraps and keep trying new designs .
Today , I am going to use the foliage dies to make some elegantly different money envelopes.
They are super fast and easy to make and look fabulous .
You will be surprised to see the final outcome .
You can see the foliage dies here .

See the video tutorial to make the basic envelope.


Here is a money wrap with photo tutorial.

   Cut the die cuts in water colour paper from foliage dies #1

 Using distress re inkers colour the die cuts. You can use any water colour medium.

 Cut a mat layer a little smaller than the envelope base in white card stock. Distress with Fired Brick, Fossilized Amber, Festive Berries and Dried Marigold distress ink. Cut out two negative die cut space using the dies as shown above .

Distress the portion of envelope where the negative space will show with Festive Berries ink.


Apply glue on the back side of the mat layer 

Adhere the mat layer on the envelope. Stick the coloured die cuts . Sorry some water . Add water droplets .
See similar designs made in the same way .


So now it's your turn to use the scoring board and make your own designed envelope.
Don't you think these envelopes are different and a fresh break from the usual floral types??

Let me know which combination you like the best .

Supplies used.

Foliage die #1
Multi purpose 12x12 scoring board
Clear water droplets
Ergo bone filder

Other products
Coloured card stock, white card stock, Distress inks Peeled paint, Peacock feathers, Fired brick, Festive Berries, Dried Marigold, Fossilized Amber
Re inkers ---Tumbled glass, Peeled paint, Festive Berries or fired brick , dried Marigold , Die cutting machine, Tacky glue

DMC products are available at:

www.crafterscorner.in for India customers and at www.dressmycraft.com for the International customers.

Facebook : www.facebook.com/dressmycraft
Instagram : https://www.instagram.com/dressmycraftLIVE Facebook Videos: https://www.facebook.com/crafterscornerlivetvYoutube : https://www.youtube.com/channel/UCExYyDP3Ag_uJk1MkxRz38w

Orders over 150$ are eligible for Free shipping internationally.

Monday, 18 February 2019

In My Heart Mini Album

Hello Friends,

This is Anita here . I hope you all are having lot of fun crafting and exploring new creative techniques. I would really like you all to visit the Dress My Craft Store to see the amazing range of products that are just perfect for card making, scrap booking and flower making. I especially love the new paper packs and have created a variety of projects with them. The love themed paper packs are just a treat for the eyes and one cannot have enough of them.

You can see my cards that I made with the In My Heart paper  HERE.

Today, I have a project that I have made with lot of hard work. The 6 x 6 Love themed Mini Album. This is a super easy mini album and looks great with the new papers and the acetate pages. These see through pages add lot of depth and beauty to the album and gives a break from the more usual kind of albums that we make.

A little note about the In My Heart paper----These papers are beautifully designed and are so versatile that one can use them for any purpose. The designs are both shabby chic and vintage and have floral prints that look so dainty and delicate. The pastel coloured roses against the pink and black background really bring out the sheer beauty of these papers. This collection has 12 x12,  6 x6 and a coordinating motif sheets that are great for making embellishments. These 270 gsm thick papers are smooth t tough with excellent quality.
You can find this collection HERE.

Now on to my album.
This is a perfect album for special occasions and can be given to both male and female. It can hold more than 50 photos and have lot of space for journaling. The tag punch and the new border lace punch makes decorating the album and easy task. I have used acetate sheets for some pages and once  you see the album , you will know the difference.

Here are a few glimpses of my album followed by a walk through the album via a video.


Video Tutorial


Dress My craft Products used

Motif Sheet

Other products

Black card stock,  Acetate sheets ,black chip board, red tacky tape, tacky glue, glossy accents, mulberry flowers, precision scissors, metal chain and charms, satin ribbon white.

All the the other products are available at www.crafterscorner.in


DMC products are available at www.crafterscorner.in for the Indian customers and at www.dressmycraft.com for the International customers.

Dress My Craft, Social media presence:
FACEBOOK:
www.facebook.com/dressmycraft
INSTAGRAM:
https://www.instagram.com/dressmycraft
LIVE FACEBOOK VIDEOS:
https://www.facebook.com/crafterscornerlivetv
YOUTUBE:
https://www.youtube.com/channel/UCExYyDP3Ag_uJk1MkxRz38w

Orders over 150$ are eligible for FREE SHIPPING INTERNATIONALLY.


Wednesday, 13 February 2019

Vintage Saga Gift Box -A video tutorial

Hello friends !!

This is Anita here with another beautiful project for you today. This is a wonderful gift box , great to look and super easy to make . The new Vintage Sage papers give such an elegant and royal look to the box and I am sure , the gifts inside this box get new identity when packaged in this box .

So now no gifts in ordinary packets . In fact, make your simple gifts even more worthy by packaging them beautifully in this vintage four tiered box . You can add so many things in this box like, small perfume bottles, chocolates , cosmetics , small jewellery pieces and what not.

The Vintage Saga paper is such that you will instantly fall in love with it. The designs are not only ornate but are so so designed that they perfectly depict the vintage era theme. The colours and the motifs truly depict the charm of the vintage age. The papers being 240 gsm thick , are very sturdy for 3d projects.

So here is my Vintage Saga Box full of assorted gifts all ready for you .

See the video tutorial below to make the complete box right from scratch.
Have fun but do not forget to leave your comments.


Video Tutorial


Supplies used 

Other products
Tacky glue, Tacky tape, kraft card stock. Metal chain and charms, metal knob, Vintage Photo distress ink, Iris paper

DMC products are available at www.crafterscorner.in for the Indian customers and at www.dressmycraft.com for the International customers.

Dress My Craft, Social media presence:
FACEBOOK:
INSTAGRAM:
LIVE FACEBOOK VIDEOS:
YOUTUBE:

Orders over 150$ are eligible for FREE SHIPPING INTERNATIONALLY.


Wednesday, 26 December 2018

Magical wand and a pop up card + Tutorial

Hi Creative Peeps

I am in a  festive and merry mood, of course its that time of the year again ! Wishing you all a very Merry Christmas.

This season I had been hooked to making lovely wands and when the Magical Unicorn papers from Dress My Craft arrived, I couldn't help myself but make one !! And instantly thought of using the most gorgeous glitters from DressMyCraft to make the magic come alive.

The unicorn craze has taken me over since long , could I stop at just a wand? ! Of course, not !! So I also have a pop up card to share with you all today. Both the projects have a step by step easy to follow instructions. Just scroll ahead !

This is what we'll be making-


For the wand, here are the measurements that are tried and tested several times :P


I use 2 strips of 3"x12" strips and 2 strips of 1.5"x12" strips in papers of your choice.


Now here I had to admit that the Dress My Craft scoring tool made my life much easier compared to previously owned , especially with this step where I  make score lines that are just .25" wide on the four strips of paper cut above in the first step.


I have folded the paper strips along score lines to make hill and valley fold. And generously sprinkled with sparkling dust and rainbow chunky glitter.


Here I started to arrange the folded strips on a small piece of round chipboard. I have used one strip to cover one half hemisphere of the wand and the second strip to cover lower half hemisphere.


In the next step I have arranged the two smaller strips in the same manner and fitted it to align with the existing folds of large strip.


Magical unicorn die cuts from Dress My Craft , some flowers from stash, feathers, a horn and an ornate chipboard flourish finish off the wand I have a stick covered in washi tape ready to be stuck at the back of wand.


Here is a close up and of course in day light ! Sorry, lighting Seattle is not too good, hence the pictures above ! :P


And voila ! Something magical came up


Are you getting the unicorn vibes already ! Lets hop on to the next project which is a pop up card


For the pop up card , please note down the above measurements and get your pattern paper ready.
Here I have used Floral Oriental cardstock from DressMyCraft for the base.


That's how the box card will come along when stuck at the ends and with patter paper in place.


These are some die cuts and fussy cutting from Magical unicorn paper pad. Note the transparency strips I have cut to stick them to my card.


This is how I have arranged the die cuts with transparencies on the strips of paper placed inside the box card.


And again ! Magic ....!

I hope you enjoyed looking at these today, feel free to ask any questions in the comments below and don't forget to check out the products used along with links from where you can directly buy .

Supplies Used:

DressMyCraft scoring tool

DMC products are available at www.crafterscorner.in for India customers and at www.dressmycraft.com for the International customers.

Facebook : www.facebook.com/dressmycraft
Instagram : https://www.instagram.com/dressmycraftLIVE Facebook Videos: https://www.facebook.com/crafterscornerlivetvYoutube : https://www.youtube.com/channel/UCExYyDP3Ag_uJk1MkxRz38w

Orders over 150$ are eligible for Free shipping internationally.


Craft Create Magic
Shubhra