Showing posts with label meher_creations. Show all posts

Sunday, 20 October 2019

Fairy pink smoke scrapbook | Meher

Hello everyone!
I hope you are doing great. This is Meher with a new post for this month and we are currently focusing on the previously launched paper pads. I have used the gorgeous pink smoke collection paper pad to create a beautiful fairy scrapbook.
If you ask me about the papers then I would say they are beautiful to create any kind of project with absolutely perfect mixed media look. I've used a lot of dies from dress my craft to embellish the scrapbook in order to give justice to the paper collection. I truly hope you like the project for today and do shower some love by sharing it.  Thank you for stopping by.

Grab a cup of coffee and enjoy the post while I explain you the details of the project.

The scrapbook is made using heavy chipboard with 1600gsm thickness and it contains six interactive pocket pages.


All the tags inside the scrapbook are punched with the beautiful circle dot border punch to give this amazing look to the scrapbook.

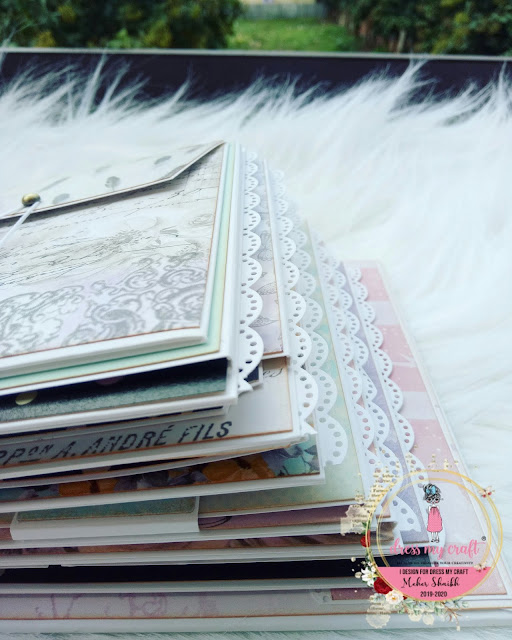


This scrapbook includes couple of 3D envelopes which adds more interest to the scrapbook. I've added a touch of blue by adding some sheets from the floral symphony collection.

List of materials used:

Pink smoke collection 
Pink smoke motif sheet 
Floral oriental cardstock
Circle dot border punch 
Scoreboard
Paper trimmer
Foliage leaves die
Foliage leaves
Gold and black sequins

Follow us:


Dress My Craft products are available at:
For Indian customers - www.crafterscorner.in
For international buyers - www.scrapbook.com

www.dressmycraft.com (FREE SHIPPING ABOVE $150 WORLDWIDE)
For wholesale or any queries, please email us: info@dressmycraft.com

Saturday, 27 April 2019

Envelopes | DMC Scoreboard | Tutorial by Meher

Hello everyone,
Hope you're doing great. This is Meher back with another tutorial post with envelopes created using dress my craft scoreboard. Yes, I've not used any envelope punch board to create the base of the envelopes this time and I've played with beautiful bright colors. The paper collection that I used is called the charming baby girl collection which is again from Dress my craft and it is one of my favorite paper collection from Dress my craft. I've provided step by step instructions below on how I created these baby envelopes. Hope you like it. 

Colorful shaker envelope:


How to create:

  1. Take a white cardstock and score at 4" , 8.5", 10.5"
  2. Turn around and score at 1/2" , 7.5" , 8"
  3. Cut the extra cardstock from both the sides.
  4. Fold the cardstock and cut the extra strips of 1/2" from the 4" and 2" sides. 
  5. Stick them and punch the corners using Dmc 3 in 1 corner punch. I used the 10mm corner side. 
  6. Cut pattern paper for the base measuring the envelope and make sure you leave 1/8th of an inch white border on all the sides. 
  7. Pick another white cardstock measuring 6" by 3.5" and trim three strips.
  8. Attach foam tape behind the strips and stick it on a colored cardstock. I've used three different colors to make my envelope look bright. 
  9. Add some sequins and crystal cubes in the empty space.
  10. Attach an acetate sheet on top of the panel.
  11. Cut another panel on pattern paper using dmc mini trimmer and stick it on the existing panel. 
  12. Cut some images from the paper collection and including the beautiful pink curtain and adhere it using foam tape. Your envelope is ready.

Frosted Envelope:


How to create:

  1. Take a white cardstock and score at 4" , 8.5", 10.5"
  2. Turn around and score at 1/2" , 7.5" , 8"
  3. Cut the extra cardstock from both the sides.
  4. Fold the cardstock and cut the extra strips of 1/2" from the 4" and 2" sides. 
  5. Stick them and punch the corners using Dmc 3 in 1 corner punch. I used the 10mm corner side. 
  6. Cut two pattern papers for the base measuring the envelope and make sure you leave 1/8th of an inch white border on all the sides. 
  7. Pick a brad and fix at the center of the envelope and adhere a twine behind to create the closure. 
  8. Fussy cut some images from the paper collection and adhere it on the flap of the envelope.
  9. Randomly apply glossy accents on the bottom of the envelope and pour frosted powder on it. 
  10. Cut a sentiment and stick on the envelope to complete it. 

List of materials used:

DMC products are available at: 
www.crafterscorner.in for India customers and at www.dressmycraft.com for the International customers.

Facebook : www.facebook.com/dressmycraft
Instagram : https://www.instagram.com/dressimycraft
LIVE Facebook Videos: https://www.facebook.com/crafterscornerlivetvYoutube : https://www.youtube.com/channel/UCExYyDP3Ag_uJk1MkxRz38w

Orders over 150$ are eligible for Free shipping internationally.

Friday, 19 April 2019

Get creative with dress my craft scoreboard | Tutorial

Hello everyone,
Hope you are doing great.
This is Meher from Meher Creations back with another post on different ways you can use Dress my craft scoreboard. We are focusing on scoreboard and bone folders this month to show you different possibilities on how you can use them.
Well, In this post I will be sharing some creative ways in creating textures on cards and other projects.


1. Layered card with shaker window


2. Card with a bunch of grapes

How to create:
  • Create a card measuring 4*6 inches on a white cardstock.
  • Cut a piece of pattern paper measuring 3.5 by 5.5 inches.
  • Cut a piece of cardstock again measuring 3 1/4 by 5 1/4 inches. Score the whole cardstock at every 1/8 inch to give a nice texture.
  • Pick a yellow pattern paper and cut a window panel on it and adhere foam tape behind. 
  • Layer all the pieces together.
  • Apply some equal amount of glue at the center of the card and start arranging round pearls randomly to give a natural grapes look.
  • Pick some leaf chipzeb pieces and color them in green using Prima chalk edgers.
  • Stick them on top of the bunch and tie a bow using twine.
  • Add a sentiment and complete your card. 


3. Banner Card

How to create:
  • Create a base card measuring 5*4 inches.
  • Pick the cover of the charming baby girl paper pad and cut some colorful glossy pieces to create banner. 
  • Adhere a piece of twine on the card and allow it to dry. 
  • Stick foam tape behind all the tiny banner pieces and adhere it on to the card.
  • Add a sentiment or a stamped image to complete the card.


4. Pocket envelope

How to create:
  • Create a base card measuring 4*6 inches.
  • Score at 1/4 inch on both the sides
  • Cut a strip from one part of the card.
  • Score at 1.5 inch to fold the envelope.
  • Stick the 1/4 inch area on to the other side of the card. That makes a pocket envelope.
  • Cut pattern papers and adhere it on the envelope.
  • Pick two brads and fix it at the centre of the envelope and tie a twine to make the closure.
  • Pick some images from the motif sheet and embellish it using foam tape. Add a sentiment to complete the envelope and fill some tags in it.


List of materials used: 
DMC products are available at: 
www.crafterscorner.in for India customers and at www.dressmycraft.com for the International customers.

Facebook : www.facebook.com/dressmycraft
Instagram : https://www.instagram.com/dressimycraftLIVE Facebook Videos: https://www.facebook.com/crafterscornerlivetvYoutube : https://www.youtube.com/channel/UCExYyDP3Ag_uJk1MkxRz38w

Orders over 150$ are eligible for Free shipping internationally.

Monday, 1 April 2019

Little miracle name plate | How to create

Hello everyone,
Meher this side from Meher Creations with a new project created using the little miracle paper collection from Dress my craft.

I've created a huge name plate that measures 20 inches. Let me take you through the process on how I created.

I painted the base using home decor chalk paint and attached a couple of pattern papers from little miracle collection trimming them in different sizes using tacky glue. I have done some gold stenciling using my favourite stencil from Dress my craft and varnished the whole name plate. I picked some mulberry flowers and attached them on two sides of the name plate. In order to add some extra flavour I ended up sprinkling some Dress my craft sparkling dust on all the flowers.
I picked the alphabets and coated them with white gesso and then colored them in my most favorite color using Prima chalk edgers. I pretty much liked the combination. I proceeded further giving some extra touch up for the letters and varnished them. Finally I added some butterflies, clear droplets and other embellishments to complete the name plate. I had a beautiful pink shabby chic lace which I ended up attaching all over the border of the name plate.

Have a look on how it turned out!!


List of materials used:
Little miracle paper collection 
Dmc stencil
Sparkling dust
Clear droplets
Roses
Frosted powder

DMC products are available at: 
www.crafterscorner.in for India customers and at www.dressmycraft.com for the International customers.

Facebook : www.facebook.com/dressmycraft
Instagram : https://www.instagram.com/dressimycraftLIVE Facebook Videos: https://www.facebook.com/crafterscornerlivetvYoutube : https://www.youtube.com/channel/UCExYyDP3Ag_uJk1MkxRz38w

Orders over 150$ are eligible for Free shipping internationally.

Tuesday, 26 March 2019

For you always | Shaker Card Tutorial

Happy Tuesday, 
Hope you are doing great.
This is Meher from Meher creations back with another post created using the beautiful for you always paper collection from dress my craft.
I've created a card with a strip shaker concept created using the mini trimmer from dress my craft. I have used a couple of dress my craft dies and fussy cut images from the collection. 
I've all the details on how you can create with step by step pictorial.


How to create:
Take a piece of black cardstock measuring 9 1/2 by 5 3/4 and score at 4 3/4 to make your base card. 
Make sure you have a thick cardstock with 250gsm or 300gsm.


Next step is to create two shaker panels using the mini trimmer. Trim the paper at every half inch to make this panel and distress it.


Cut a base sheet from the pattern paper measuring 4 5/8 by 5 5/8 and stick it on your card base.


Attach foam tape to the black panel and adhere it on to your card.


Fill the panel with some micro beads and red hearts.


I'm adding some crystal ice cubes to give more interest.


Once you're done with all the filling attach acetate sheet on the black panel and stick your pattern paper panel on it.


I've fussy cut some images from the paper collection to decorate the panel.


Attach this piece at the bottom and the other piece on the top using tacky glue.


I've done some die cutting on black cardstock, gold cardstock and pattern paper to stick on my card.


I layered all the three pieces on top of each other giving a shadow effect and completed my card.


Hope you liked it. Thank you for stopping by.

Regards
Meher Shaikh

List of materials used:

For you always paper pad
Micro beads
Little hearts
Crystal cubes
Classic doily
Foliage die
Kissing boy and girl die
Tropical swirls die
Kissing couple die
I love you die

DMC products are available at: 
www.crafterscorner.in for India customers and at www.dressmycraft.com for the International customers.

Facebook : www.facebook.com/dressmycraft
Instagram : https://www.instagram.com/dressimycraftLIVE Facebook Videos: https://www.facebook.com/crafterscornerlivetvYoutube : https://www.youtube.com/channel/UCExYyDP3Ag_uJk1MkxRz38w

Orders over 150$ are eligible for Free shipping internationally.

Thursday, 7 March 2019

Embellishments | Magical unicorns

Hello guys,
Hope you are doing great. I'm Meher from Meher Creations back with another post with some pretty little handmade embellishments I created using the magical unicorns paper collection and other Dress my craft products.
As you all know that Dress my craft has the best sequins, glitter powders and flower pearls ever, I have tried to use a few of them and show you how beautifully they enhance your projects.
Well, I also have attached some in the process pictures for you to know what you can do with the scrap of papers lying in your craft room.
Yes, working on teeny tiny embellishments is definitely a difficult job to do but if you love it, you enjoy it and do wonders. I absolutely love creating different embellishments. Although I have so many trials and errors I don't hold myself from trying something new. This time I have also gone back to my school days when I used to work with sketch pens. 😛
Hope you like what I created and do leave your comments if you have any queries.

Moving on.. 
These are the teeny tiny embellishments I created using the magical unicorns paper pad and some dress my craft dies. I stamped the images on two different color pattern papers and one on white cardstock. I've then fussy cut bits and pieces and arranged them on the white cardstock image. I used DMC micro beads to give an add on look and layered the straws on DMC silver mirror cardstock. I have used some DMC rainbow glitter, sparkling dust and frosted powder on all the embellishments. The micro beads, glitters, frosted powder and clear droplets are fixed using glossy accents. I've stamped some sentiments on white cardstock and layered on DMC silver mirror cardstock to highlight them. Have a look. 


I've used two of my favorite dies from DMC to create this tag embellishment. The tag and the girl holding the red balloons are the two beautiful dies from DMC. 
I've colored the die cut on a white cardstock using Prima chalk edgers and added a layer of frosted powder on it. The red balloons are coated with micro sparkling dust to give a beautiful fairy dust effect on them. I then stamped an open envelope and a sentiment and layered it on my tag. 


This is a set of 6 beautiful ready to use embellishments created using the magical unicorns paper collection.

Here are two pretty pink bows I created using the pink sheet from the magical unicorn paper pad and attached a bling at the centre. These bows can be used on any projects like scrapbooks, cards, boxes, frames etc. These bows truly enhance the projects and these can be created using any scrap pieces lying in your craft room.

Some in the process pictures


List of materials used:
Magical unicorns paper pad
Couple die
Kiss me die
Micro beads 
Frosted powder
Rainbow glitter 
Sparkling dust 
Silver mirror cardstock 
Micro roses 
Clear droplets 

DMC products are available at: 
www.crafterscorner.in for India customers and at www.dressmycraft.com for the International customers.

Facebook : www.facebook.com/dressmycraft
Instagram : https://www.instagram.com/dressimycraftLIVE Facebook Videos: https://www.facebook.com/crafterscornerlivetvYoutube : https://www.youtube.com/channel/UCExYyDP3Ag_uJk1MkxRz38w

Orders over 150$ are eligible for Free shipping internationally.